
 Before you begin a new C++ application I suggest you create a new folder somewhere and call it something like C++_Applications. This will serve as a repository for all of your code.
Open Microsoft Visual C++ 2010 and on the Start Page click the New Project button:


MS Visual C++ provides several types of projects that you can create. In this tutorial we are just going to create a small CLR Console Application. This means that we will be interacting with our application via the Windows Console. Later we will be creating Class Libraries and Windows Forms applications which, in addition to coding, demands their own interface to be built.
For this example we are going to create an application that calculates Inequalities. Click on the CLR Console Application and give it the name Inequalities. Change the Location to your C++ Applications folder that you’ve created. Click OK.
MS Visual C++ will now create the basic folder and subfolder structure in your folder. It will also create all the basic headers, dependencies, resource files, and source files that are needed for an application to run.
Since we are building an application that calculates inequalities we need to add 2 new files: a Header File (to hold all of our Inequality Function declarations), and a Source File (to hold the code that runs our Inequality Functions).
Header Files

Header Files are one of several required components of a C++ program. If it isn’t for speeding up the compile time of large applications or for organisational purposes, a Header File is mainly used to keep your source code separated from external processes; in other words they act as an interface. Without a header file, any time you wrote source code that referenced a function that you created you would have to literally declare every variable that it used, for each occurrence of that function. However, with a properly implemented header, you need only declare #include "myHeader.h" in your source code’s preamble and the function will be completely declared once and for all. In the Solution Explorer on the left hand side, right click on the Header Files folder and Add New Item. Pick a new Header File from the resulting menu. Double click on the Inequalities.h file and paste the following code in to it:
// Inequalities.h
#ifndef Inequalities_HPP
#define Inequalities_HPP</code>

double Max(double x, double y);
double Min(double x, double y);

#endif
In this Header File we have written out the declaration of two functions, namely a Min function and a Max function, and they both take two arguments. To make this header consistent with our program we need to define these two functions in a Source File.
Source Files
A source file (a file that ends with .cpp) contains the detail of your functions and processes that get used in your programs. For our simple Inequality program let’s go ahead and right-click on the Source Files folder and Add New Item. This time choose to add a new C++ File. Double click on the Inequalities.cpp file and paste the following code in to it:
// Inequalities.cpp : Code for what the functions in the header actually do.

#include "stdafx.h"
#include "Inequalities.h"

using namespace System;

double Max(double x, double y)
{
if (x>y)
return x;
return y;
}

double Min(double x, double y)
{
if (x<y)
return x;
return y;
}
Running Your First C++ Program
To run the program we need to create another source file. So right-click the source files folder and add a new C++ file, call it “Test”. Open up Test.cpp and paste the following code in to it:
// The code for Test.cpp : Code for running/gathering input/interacting with console.
#include "stdafx.h"
#include "Inequalities.h"
#include <iostream>

int main()
{
 using namespace std;

 double d1, d2;
 char c;

 cout << "Enter the first number: " ;
 cin >> d1;

 std::cout << "Enter the second number: ";
 std::cin >> d2;

 std::cout << "What function do you want to use? a) Min, b) Max? ";
 std::cin >> c;

 if (c=='a')
 {
 cout << "The minimum of your two numbers is: " << Min(d1,d2) << endl;
 }
 else
 {
 cout << "The maximum of your two numbers is: " << Max(d1,d2) << endl;
 }

 system("pause");
 return 0;

}
Running the Program
Okay, so you have
- a Header File – containing function declarations,
- a Source Code File – containing the code for what the functions actually do,
- and another Source Code File – containing the main() function for testing.
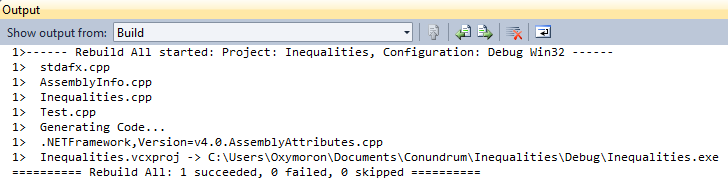
Go ahead now and click on Build > Build Solution. The compiler will now go and check that it has all the required files. The output window should now display the files that it checked; then it generates the code; and if it compiles then you get a succeeded note:
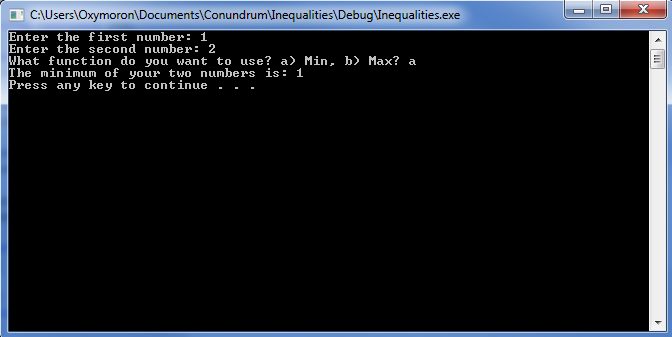
If your solution build succeeds click the play button and the console window should pop up.
Previous: 1. Installing Your First C++ Compiler | Next: 3. Create Your First C++ Class
