
Introduction
In the previous article on superdense coding we built a very simple Qiskit program that ran the superdense coding program straight from the website without really going in to why it works.
In this article we are going to build on our knowledge of
- CNOT Gate
- Hadamard Gate
- Bell States
- Entanglement (maximal correlation)
that we covered in the previous article and provide some real understanding to why and how superdense coding actually works!
In particular we will make use of being able to create a superposition of two qubits by using the Hadamard gate and then kill off any unwanted, uncorrelated states using the CNOT gate. We will see that the desired outcome of applyinga CNOT gate here really depends on the initialisation states of the qubits: the all-zeroes initialisation yields maximally correlated Bell states after a Hadamard and a CNOT (it doesn’t if they’re initialised to the all-ones state!)
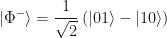
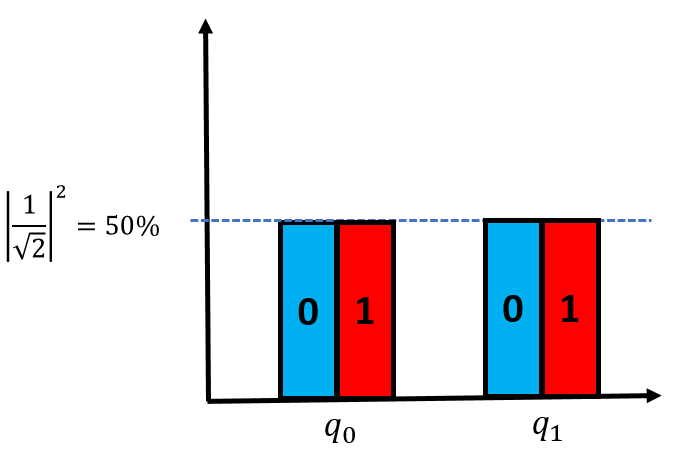
Recall that the Hadamard gate for 2 qubits is the 
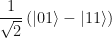
and applying this to the zero state qubit is

which, of course, after taking the absolute value-square produces either a 0 or a 1 with 50% upon measurement.
A Quick Note on the Initial All-Zeroes State
Applying this combination of Hadamard-and-then-CNOT to get the maximally correlated Bell states (a.k.a. entangled states) only works if the qubit register is initialised in the all-zeroes state – which is why the starting qubits are always 

Hadamard in Qiskit
In Qiskit, we can apply a Hadamard gate to the first qubit with the following Python command:
qc.h(q[0])
where qc is a QuantumCircuit object, and q[0] is the first (indexed zeroeth) qubit.
In the previous article we discussed how a Hadamard gate following by a CNOT gate creates the maximally correlated qubits called Bell states.


Crucially, the states on the right-hand side contain only 2 of the possible 4 combination of states. The sequence of applying a Hadamard followed by a CNOT gate kills off 2 of the 4 states and leaves behind these maximally correlated qubits.
CNOT in Qiskit
In Qiskit, we can apply a CNOT gate to the first qubit with the following Python command:
qc.cx(q[0], q[1])
The first qubit in the parentheses is the control qubit and the second is the target qubit.
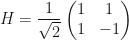
We recall here that the first two Bell States are obviously maximally correlated (and hence entangled) because the state of the second qubit always has the same state of the first qubit. Even though measuring a 0 or a 1 on the first qubit is still totally random at 50% each, the state of the seconed qubit (also randomly 0 or 1 wih 50% chance) will be the same 0 or 1 as the first.
The second two Bell States are maximally anti-correlated.
Intuitively, these qubits that are maximally correlated or anti-correlated are entangled.
Reversing the Hadamard & CNOT
Since the Hadamard and CNOT gates are reversible we could actually apply Hadamard-then-CNOT-then-CNOT-then-Hadamard (a total of 4 gates) to completely undo everything!
This means that if we give someone a pair of entangled qubits then all they would have to do is apply the CNOT and then the Hadamard to reveal the initial states of the original input qubits!
Housekeeping
But first, some housekeeping.
Please follow this section if it has been a while since you loaded up your virtual environment. Otherwise, if your are comfortable with your virtual quantum computer, you may want to skip ahead to the next section.
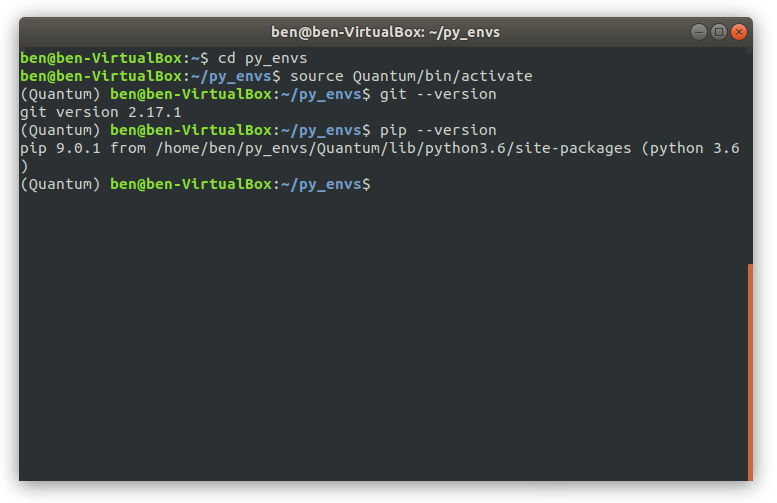
As it has been a while since I last looked at my virtual machine, I’m going to follow the next steps to ensure it is working.
So let’s spin up the virtual machine and load Terminal in Ubuntu wih Ctrl+Alt+T and let’s get our quantum virtual environment back up and running.
We always start by updating the package manager just in case it has gone out-of-date between virtual machine uses:
$ sudo apt update && sudo apt upgrade
$ cd py_envs
and activate the Quantum virtual environment with
$ source Quantum/bin/activate
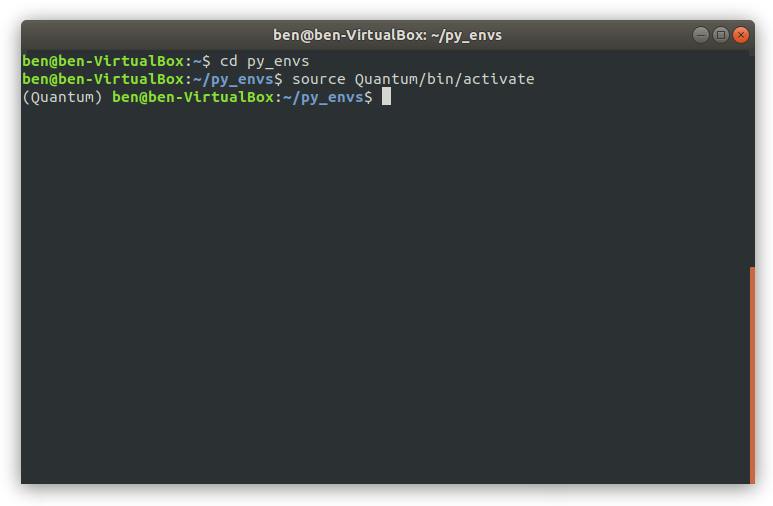
Note the command line now begins with (Quantum).
Verfiy we still have Git and Pip running by typing the following commands
(Quantum) $ git --version
(Quantum) $ pip --version
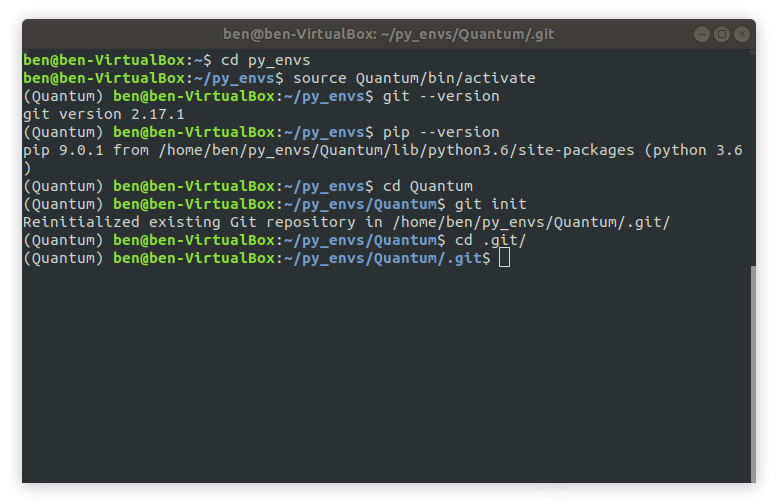
Re-initialise our Git Repository (repo) in the Quantum virtual environment by first changing directories, and then initialising with these commands:
(Quantum) $ cd Quantum(Quantum) $ git init
This will re-initialise our .git folder inside the Quantum virtual environment folder structure. Change directory to this folder to view the basic skeleton structure of an empty Git Repo:
(Quantum) $ cd .git/
Remind ourselves of our requirements package by opening it and scrolling down to our Qiskit libraries:
(Quantum) $ nano requirements.txt
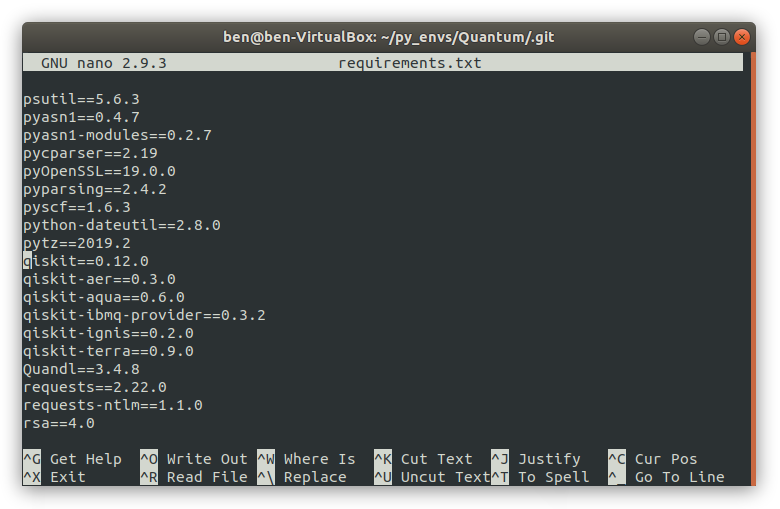
ctrl+x to quit nano.
Go back one directory with cd .. and check the status of git with
(Quantum) :~/py_envs/Quantum$ nano requirements.txt
Then ctrl+X to exit nano.
Superdense Coding
We begin by importing he Qiskit QuantumCircuit as qc, and the QuantumRegister as qr:
from qiskit import QuantumCircuit as qc
from qiskit import QuantumRegister as qr
from qiskit import ClassicalRegister as cr
and let us create a register of 2 qubits, a register of 2 classical qubits (to measure on), and initialise a circuit object:
q = qr(2, 'q')
c = cr(2, 'c')
circuit = qc(q, c)
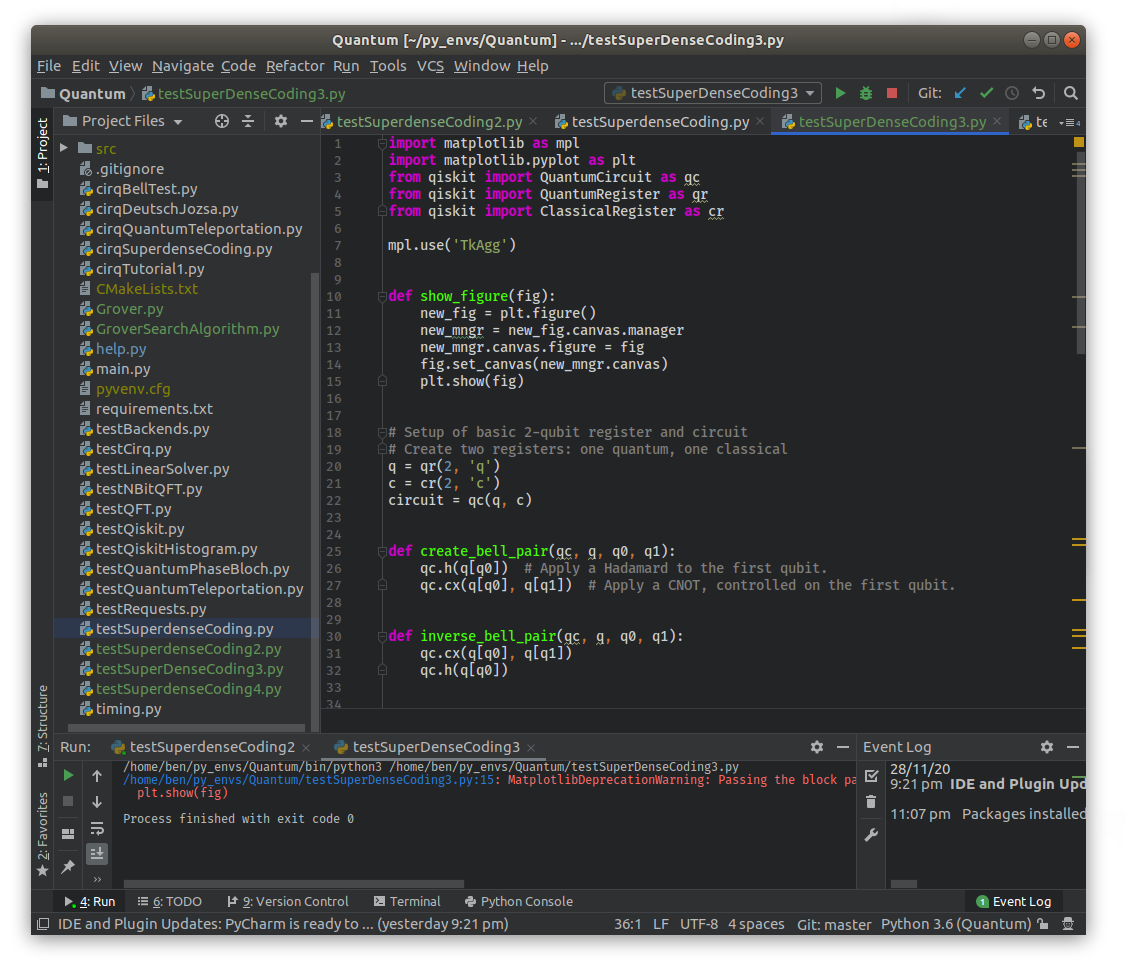
Creating a Bell Pair Function
We know that applying a Hadamard followed immediately by a CNOT gate produces one of the Bell States (depending on the input – each combination of input: 00, 01, 10, or 11 maps to one of the 4 Bell States), we may as well create a function that does this:
def create_bell_pair(qc, q, q0, q1):
    qc.h(q[q0])
    qc.cx(q[q0], q[q1])
Now, we can also create the inverse Bell creation function:
def inverse_bell_pair(qc, q, q0, q1):
    qc.cx(q[q0], q[q1])
    qc.h(q[q0])
Your program should now look like this:
The Message Encoder
Now we are going to create our encoder function. This function will input some random message, called message_to_send, which must be one of the four possible strings: 00, 10, 01, or 11 (not much room to move here since we are only working with 2 qubits!).
The problem is:
How do we encode a message?
Let us create, at the very least, a skeleton function to get started:
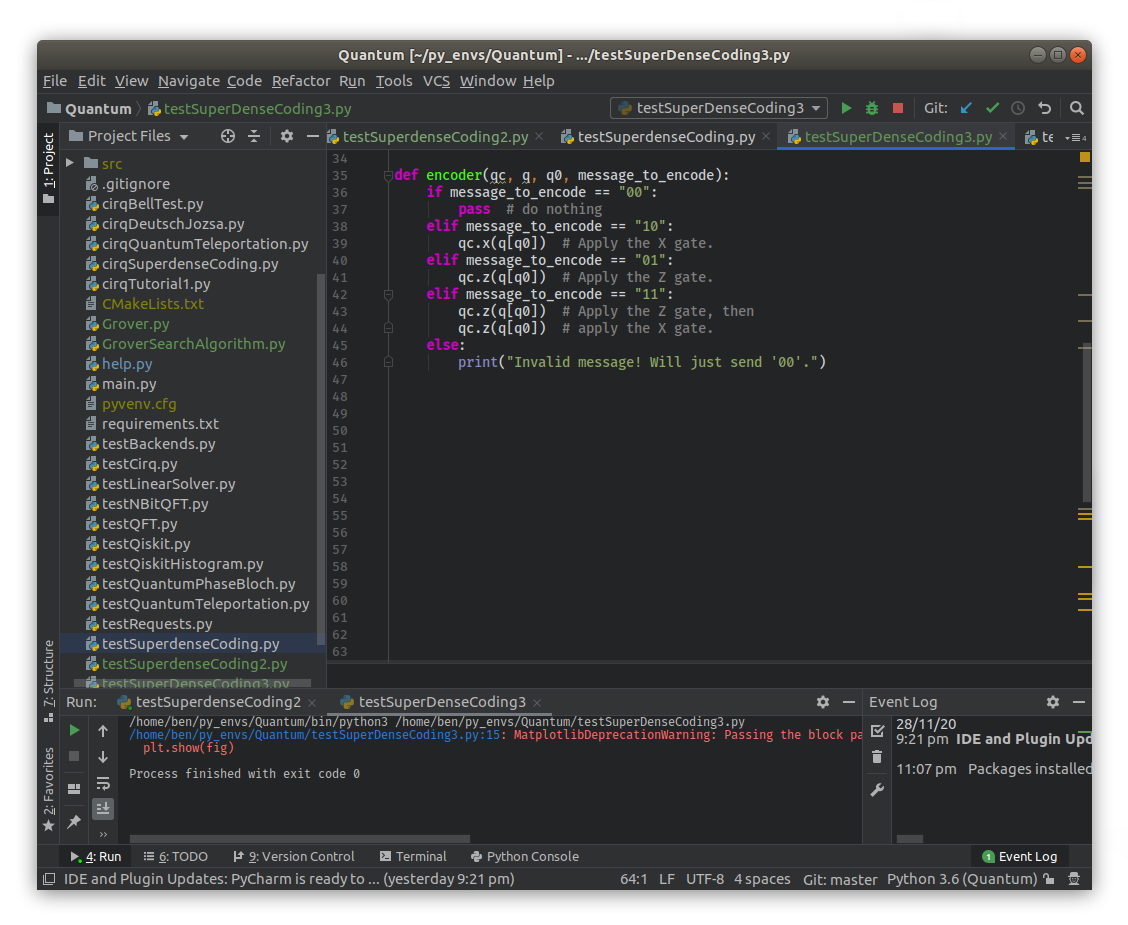
def encoder(qc, q, q0, message_to_encode):
    if message_to_encode == "00":
        pass # do nothing.
    elif message_to_encode == "10":
        pass # do something to encode it!
    elif message_to_encode == "01":
        pass # do something to encode it!
    elif message_to_encode == "11":
        pass # do something to encode it!
    else:
        print("Invalid message! Will just send '00'.")
So how do we encode the message?
Encoding the Message
OK, here are the rules:
- Alice wants to send 2 qubits worth of information.
- Alice can only encode 1 qubit worth of information.
- Therefore, the only gates the encoder can use are 1-qubit gates.
So let us try this:
- If the message Alice wants to send is the
00message, then she does nothing to her one qubitq0, - If the message is the
10message, then Alice will take her one qubitq0and apply the one-qubitXgate. - If the message is the
01message, then Alice will take her one qubitq0and apply the one-qubitZgate. - Finally, if the message is the
11message, then Alice will take her one qubitq0and apply the one-qubitZgate, followed immediately by the one qubitXgate.
Therefore, our encoder function now looks like this:
def encoder(qc, q, q0, message_to_encode):
    if message_to_encode == "00":
        pass         # do nothing.
    elif message_to_encode == "10":
        qc.x(q[q0])  # Apply the X gate.
    elif message_to_encode == "01":
        qc.z(q[q0])  # Apply the Z gate.
    elif message_to_encode == "11":
        qc.z(q[q0])  # Apply the Z gate and then...
        qc.x(q[q0])  # apply the X gate.
    else:
        print("Invalid message! Will just send '00'.")
You might be thinking at this point: “there is no way Alice can convey two bits of information to Bob by sending only one bit!”. And that’s a good thought! Classically, Bob would receive either a 0 or a 1 and have no way of knowing what Alice’s second bit is.
Quantumly, we are doing the same thing. Except we are somehow colouring the 0 and 1 a certain colour to convey what that second qubit is. See, colour is not a property one can play with classically. Quantumly, however, we can. Although it’s not called colour.
So how do we colour our qubit so that Bob knows what Alice’s second qubit is? You know, maybe Bob receives a red 0, and this tells him that the second qubit is a 0; and if Bob receives a blue 0, this means that the second qubit is a 1. Colouring qubits this way is conveying two bits of information using just one bit, plus utilising a extra degree of freedom (colour) that classical bits just don’t have.
Well, the encoding we just did is the effective colouring of the qubits!
The X gate “colours” the qubit a certain way, as does the Z gate and the ZX gate. Let’s see how that works.
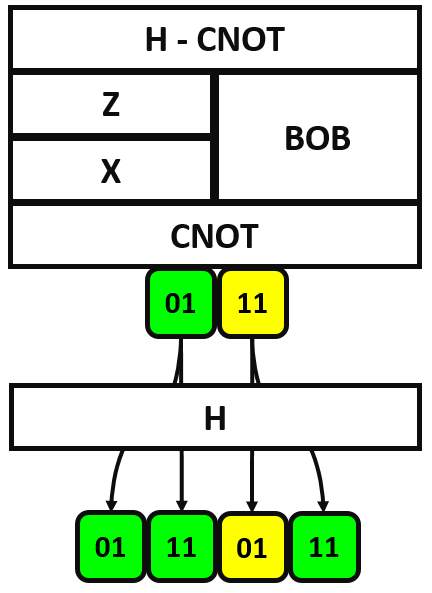
Alice Sends 11
Let’s suppose that Alice wants to send two qubits worth of information: the 11 state, but can only send 1 qubit to Bob. According to the superdense coding protocol (the inverse_bell_pair function), the 2-qubit register is initialised in to the all-zero state and passed through a Hadamard gate:
so the first qubit (

With 2 possibilities for 2 qubits, that is 4 combinations altogether:
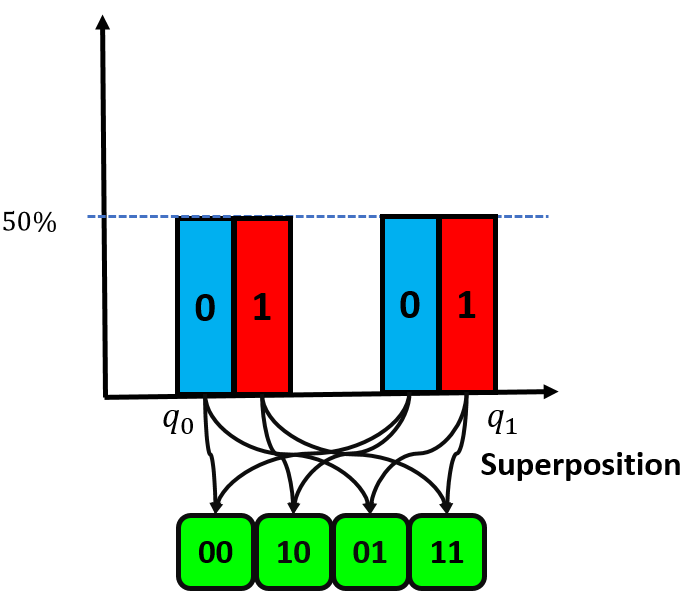
We destroy two of those four possibilities with a CNOT gate, resulting in:
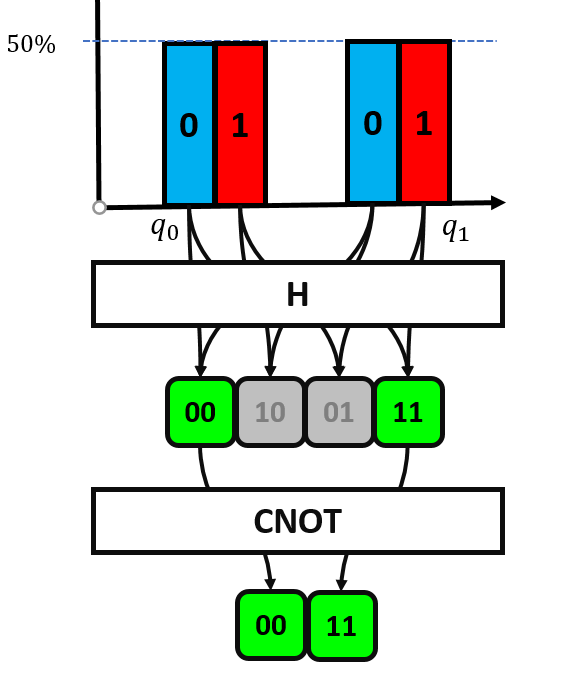
…and we have our Bell State (entangled – maximally correlated).
From here, we use our Superdense Coding Protocol.
Since Alice is sending the 11 state we now run the register through the ZX gate. First up, the Z gate:

Since both 


and, as you can see, without physically using an extra qubit, we have essentially “coloured” the
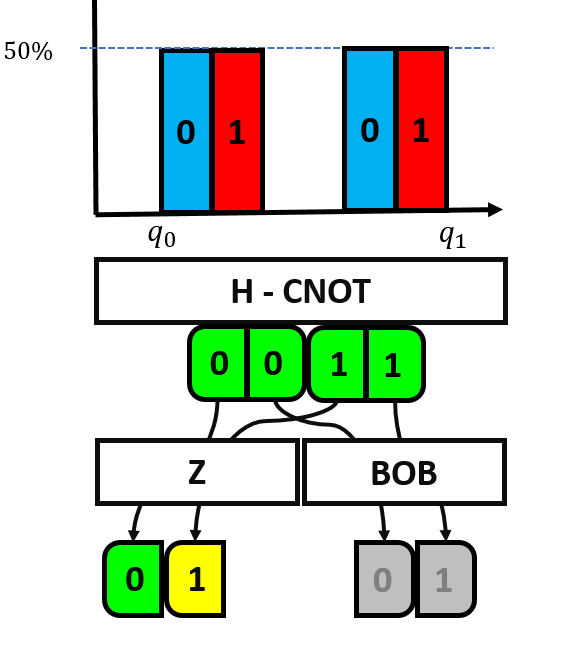
In the above illustration it is clear that the
Meanwhile, the qubit sent over to Bob had nothing done to them. So we grey them out.
Now for the 
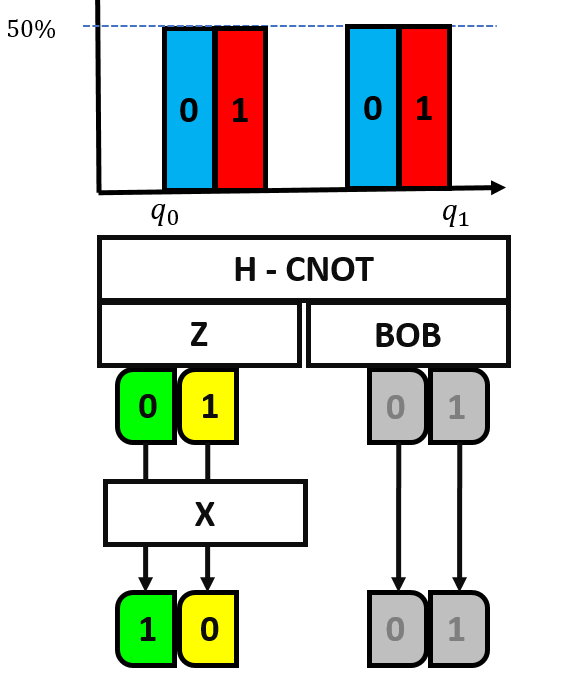
and, as you can see, we still have an entangled state except that it is slightly coloured yellow (the negative phase that it picked up by the
But this gate is crucial, as we will see, because now the negative yellow colouring is on the zero! And we will need this to cancel out something later on…
Bob Receives Alice’s Qubit!
So, Bob opens up his mail and sees that he has been sent precisely one qubit from Alice. He does not look at this qubit, not yet! But he hopes that somehow, when he does look at it, he will learn two bits of information!
So Bob takes that qubit
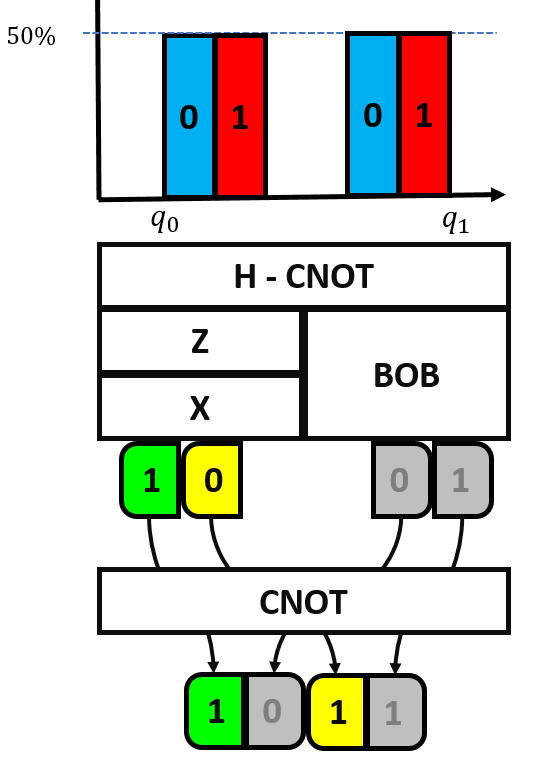
The above illustration shows that for Alice sending the 11 message, the overall state of the quantum system is now:
Now, performing the CNOT gate:
which reflects the computation:

Note that the second 
And now, it is clear, that the postive 
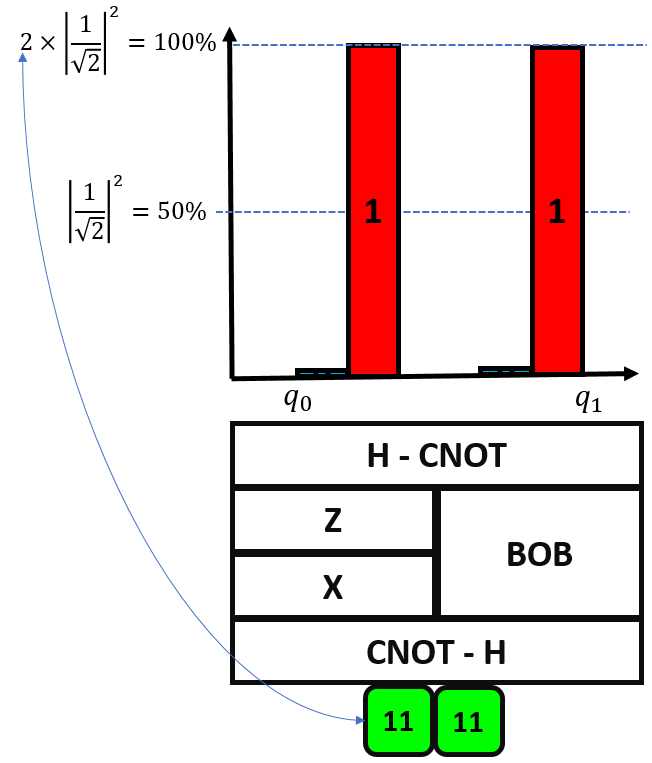
…and Bob can be sure that Alice’s encoded message was “11”.
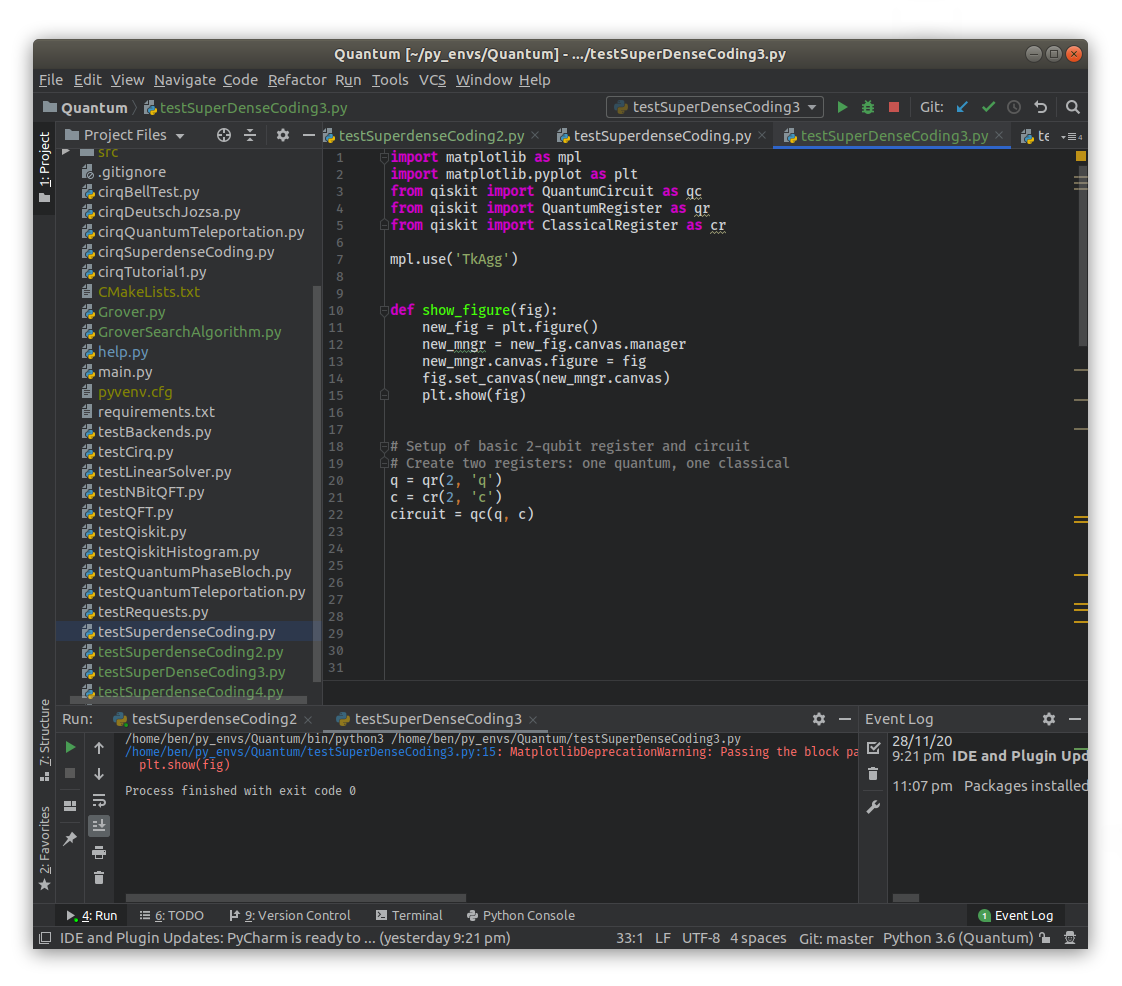
The full program so far is:
import matplotlib as mpl
import matplotlib.pyplot as plt
from qiskit import QuantumCircuity as qc
from qiskit import QuantumRegister as qr
from qiskit import ClassicalRegister as cr
mpl.use('TkAgg')
def show_figure(fig):
new_fig = plt.figure()
new_mngr = new_fig.canvas.manager
new_mngr.canvas.figure = fig
fig.set_canvas(new_mngr.canvas)
plt.show(fig)
# Setup of basic 2-qubit register and circuit.
# Create two registers: one quantum, and one classical:
q = qr(2, 'q')
c = cr(2, 'c')
circuit = qc(q, c)
def create_bell_pair(qc, q, q0, q1):
qc.h(q[q0]) # Apply a Hadamard to the first qubit.
qc.cx(q[q0], q[q1]) # Apply a CNOT, controlled on the first qubit
def inverse_bell_pair(qc, q, q0, q1):
qc.cx(q[q0], q[q1])
qc.h(q[q0])
def encoder(qc, q, q0, message_to_encode):
if message_to_encode == "00":
pass
elif message_to_encode == "10":
qc.x(q[q0])
elif message_to_encode == "01":
qc.z(q[q0])
elif message_to_encode == "11":
qc.z(q[q0])
qc.h(q[q0])
else:
print("Invalid message! Will just send '00'.")
# Main
create_bell_pair(circuit, q, 0, 1)
circuit.barrier()
# Qubit 0 goes to Alice, and qubit 1 goes to Bob.
# Alice wants to send the 2-bit message:
message_to_send = "11"
# Encode the 2-bit message on to 1 qubit:
encoder(circuit, q, 0, message_to_send)
circuit.barrier
# Alice sends her single qubit to Bob.
# Bob receives Alice's qubit and puts it with his
# in a register. Then decodes it using the inverse
# Bell state creator:
inverse_bell_pair(circuit, q, 0, 1)
circuit.barrier()
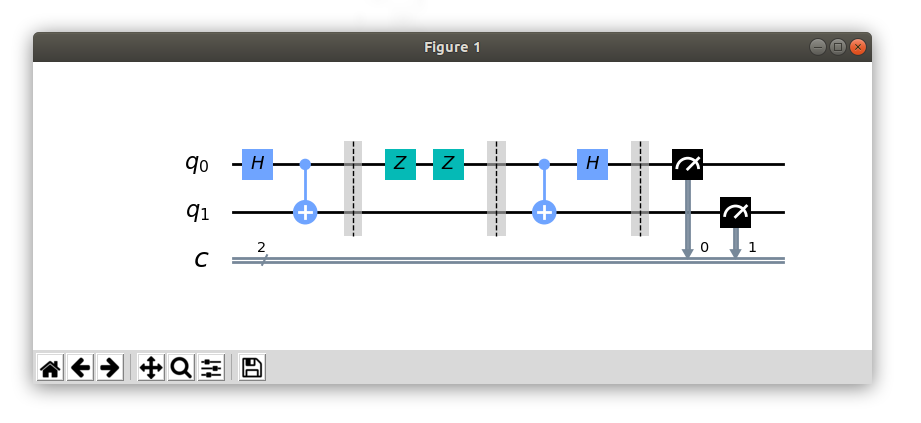
# Plot Circuit
diagram = circuit.draw(output='mpl')
show_figure(diagram)
The circuit should output like this:
Conclusion
In this article we explored the Superdense Coding Protocol but utilising our advanced knowledge of the Hadamard gate, the CNOT gate, and understanding of maximally correlated (or entangled) qubits.
We then performed a trick whereby we changed the phase of one qubit from positive (green) to negative (yellow), with the colours helping us through the illustrations.
We were able to convey two bits worth of knowledge by using this colouring methodology but interacting with only one bit – something which is impossible to do with classical bits.
Finally we went through the protocol step-by-step with one of the four possible encodings that Alice could do to see what happens and show how Bob can decode the encoding to learn what the 2-bit message.
In the next article we will:
- explore the other 3 components of the Superdense Coding Protocol and,
- hook this up to a real quantum computer and run it.
References
My Code Repository can be found on my public GitHub:
https://github.com/BenWhiteside/Quantum
This blog’s program can be found under
https://github.com/BenWhiteside/Quantum/testSuperdenseCoding3.py
[1] Chapter 2.3 of Nielsen & Chuang “Quantum Computation and Quantum Infortmation” (2016)
[2] Chapter 7.2 of Hidary “Quantum Computing: An Applied Approach” (2019)
[3] https://qiskit.org/textbook/ch-states/single-qubit-gates.html#ynzgatez
[4] https://qiskit.org/textbook/ch-algorithms/superdense-coding.html
[6] http://einsteinrelativelyeasy.com/index.php/quantum-mechanics/154-hadamard-gate-on-multiple-qubits
