Introduction
Update 2023! Please refer to my latest QuantLib build blog for VS2022 and 64-bit Windows.
Today I decided to install the latest version of Microsoft’s Visual Studio (VS) 2017 (Community) and get Boost and QuantLib installed. It wasn’t straightforward and I made a lot of mistakes and wasted a lot of time along the way. Installing VS was easy. Just follow the instructions here and you’ll have VS2017 installed in no time. The new Installer application makes it easy to add and remove components of VS, I just started off with the basic recommended installation.
In the next blog post we will run our first program using QuantLib.
Installing Boost
In order for QuantLib to run you need Boost. I used Boost 1.66 0.7 from Sourceforge.net by searching for Boost C++ Libraries. Here is the Sourceforge link. Or you can also go to the Boost website here.
When this downloads unpack it in to a folder. I used C:\...\Boost\. A new folder will be created called C:\...\Boost\Boost_[version]\.
You will now need to bootstrap the files to get a working build of Boost. To do this open up a Command Prompt window and change directory to C:\...\Boost\boost_[version]\tools\build\. Run the bootstrap.bat batch file.

This will have created an executable file inside that same folder called b2.exe. You will need to copy this file out of the build folder and in to the root folder by typing in copy b2.exe ..\..\b2.exe. Go back to the root folder now by typing in cd ..\.. . Now run b2.exe. This will install Boost in to the same folder structure and will take about 1 hour.
Installing QuantLib
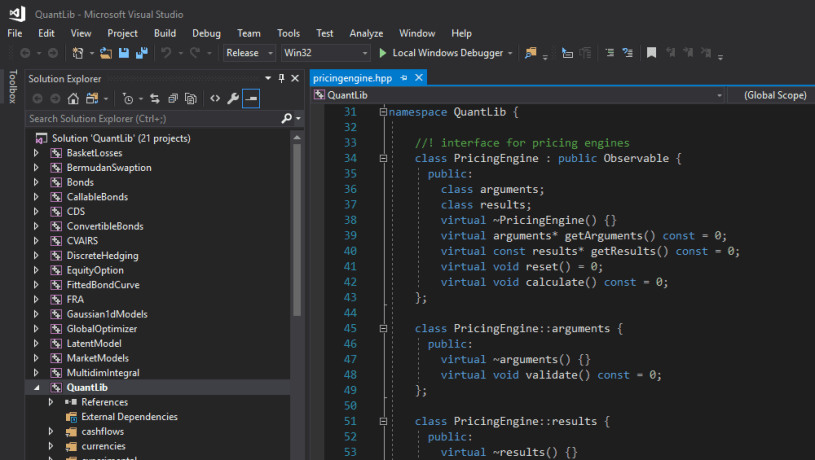
Follow the link here to download the latest QuantLib libraries (at the time of writing this was version 1.14). Once downloaded unzip them in to a folder such as C:\...\QuantLib\. Navigate to the folder where the binaries were unpacked and double-click on the QuantLib.sln solution file. If you have installed VS2017 correctly, this should open up in VS. Watch as it Updates and Migrates the project to the conform to the VS2017 platform. There should be zero errors and warnings, at least for me, this step worked like a charm. Allow it to finish scanning for include files and wait for the Ready message.
Important! When in VS, choose Release from the Configuration menu in the toolbar. We will also get around to compiling it under debug mode too, but for now we want a release build. I also chose the Win32 platform to build on. Note that if you then attempt to link a non-Win32 or non-x86 C++ program you will get errors. The active solution configuration (Debug or Release) and the active solution platform (Win32 or x64) must match the C++ you are building!
QuantLib in Visual Studio
The Property Manager
So you have VS2017 showing Release config and Win32 platform. Now open the Property Manager.
Where is it!?
They hid it in VS2017. To get to it navigate to View > Other Windows > Property Manager. Once the window pops up it should become the third or fourth tab in your Solution Explorer pane (along with Properties).
Property Manager is very important for what we are about to do. I originally mistook Solution Explorer for Property Manager and got stuck in a heap of trouble. So make sure you perform the next set of operations on Property Manager.
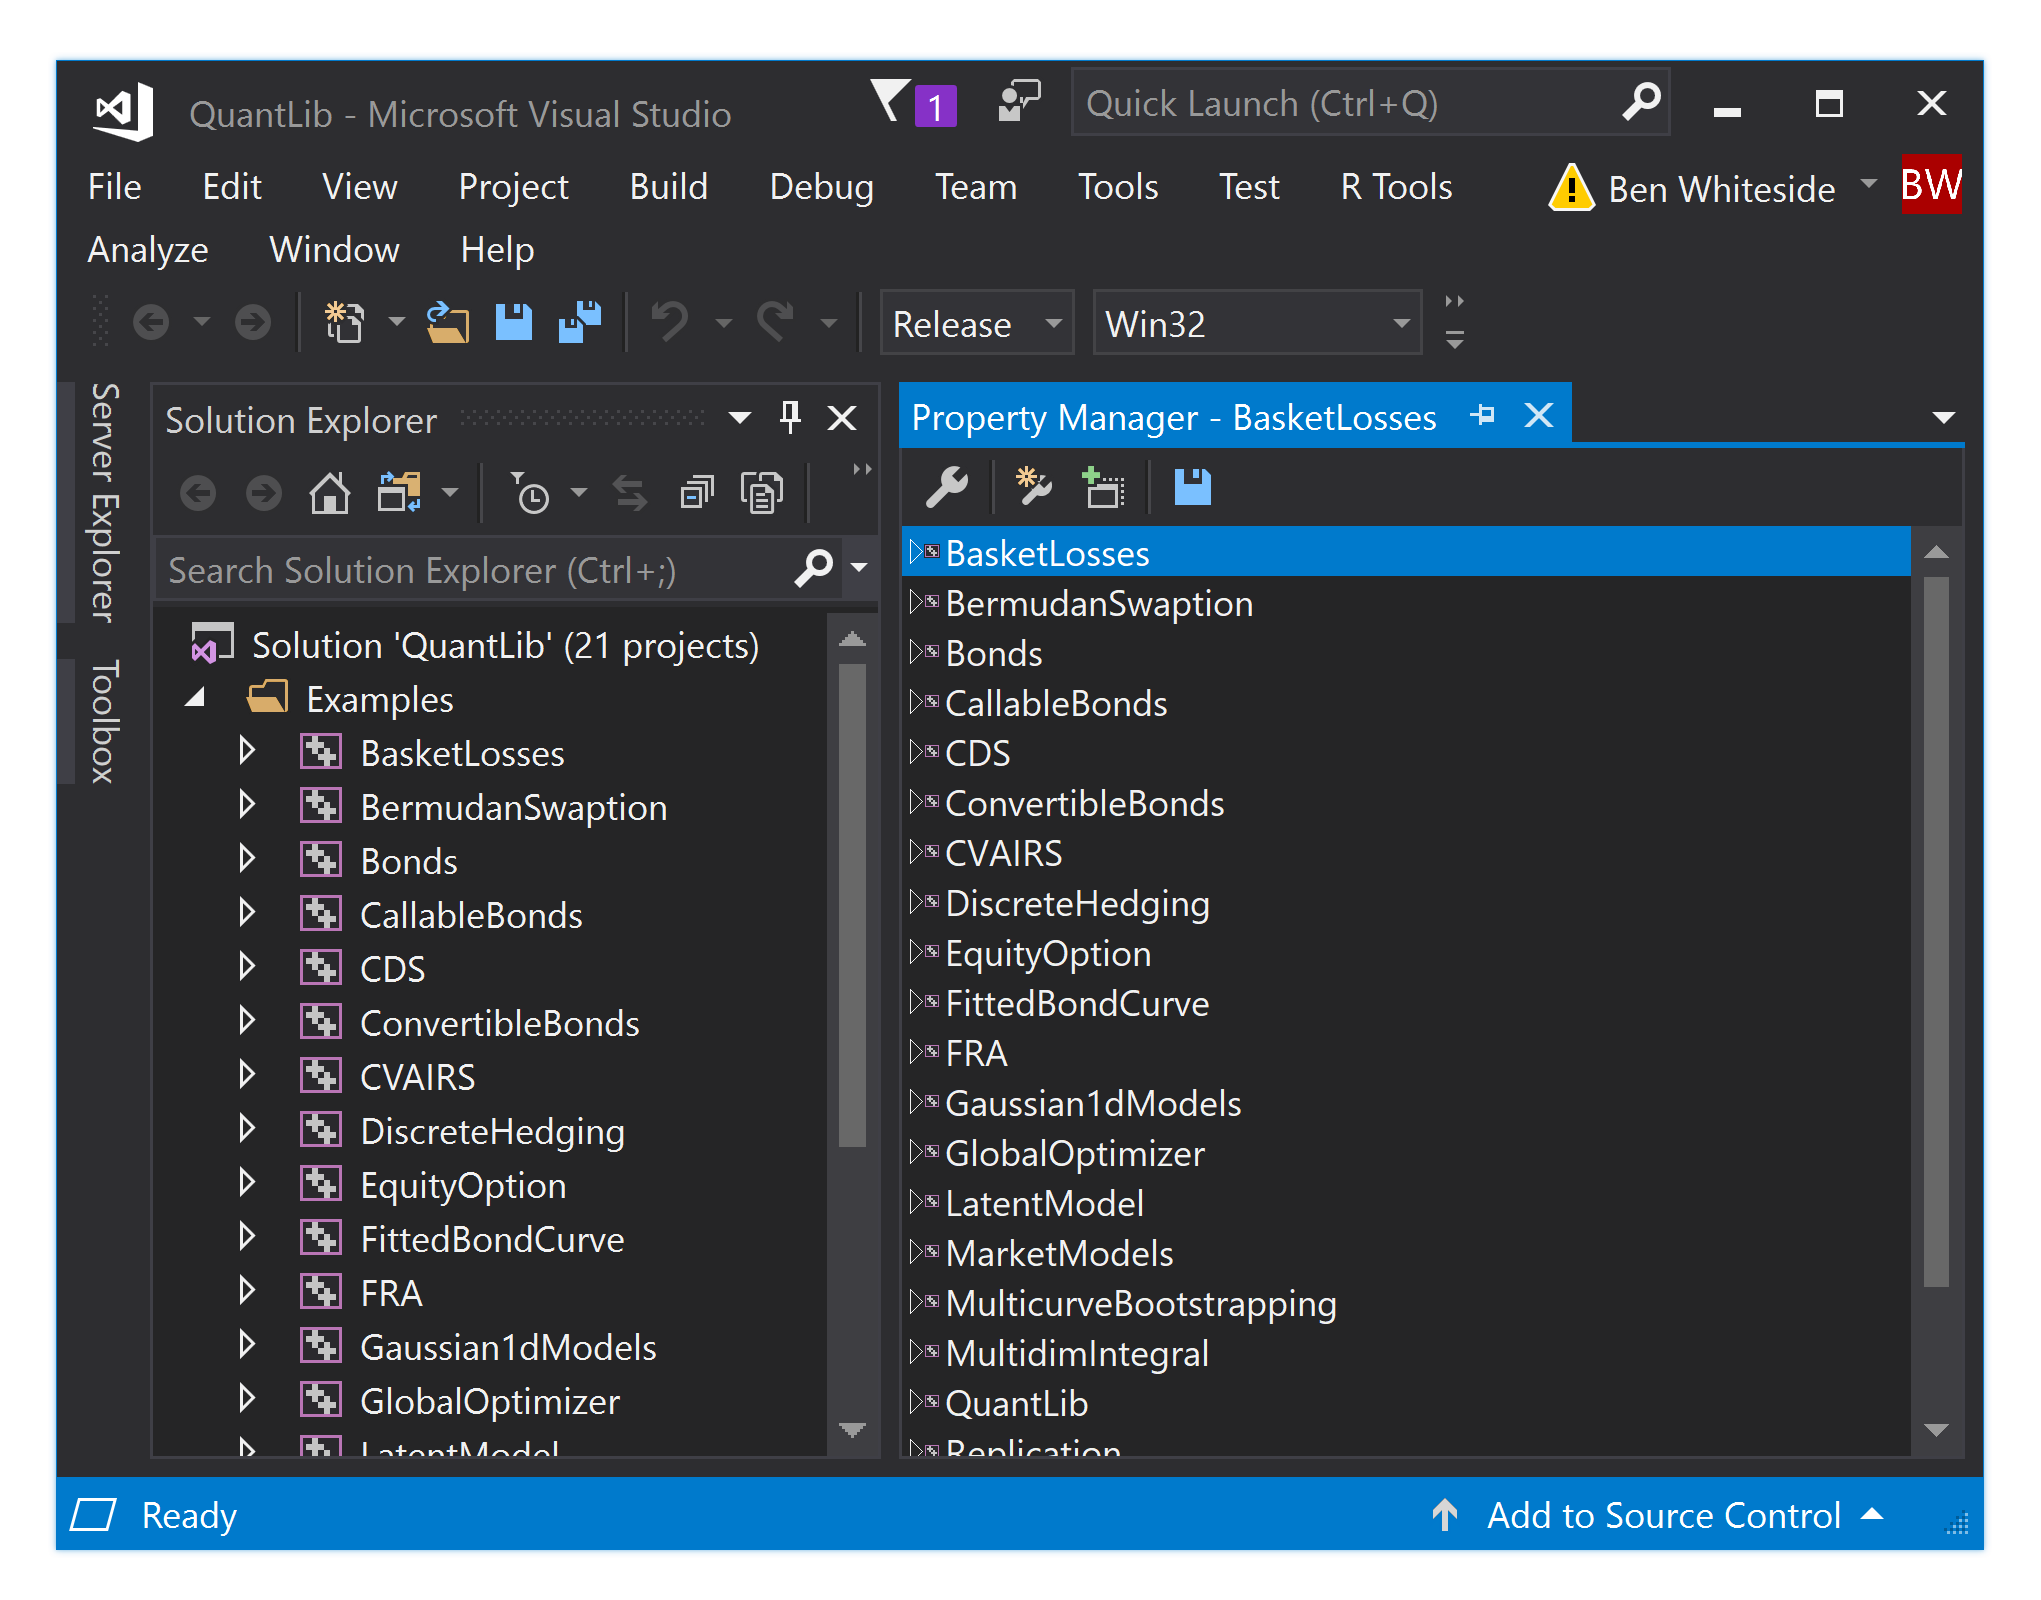
In Property Manager you should see a list of items, namely a list of Financial Instruments beginning with Bermudan Swaption. Scroll down until you find the QuantLib property item in the list. Expand it.
Inside it you will see several (at least four) Win32 sub-items called Debug and Release (two each). Expand all four. Inside these, multi-select (by holding down control) the Microsoft.Cpp.Win32.user properties. Once multi-selected, right-click on one of them and select their Properties.

A window of Common Properties will pop-up. In the list on the left-hand side select VC++ Directories. Then in the General pane add a new directory to Include Directories and to Library Directories. The Include Directories should be C:\...\Boost\boost_[version]\ and the Library Directories should be C:\...\Boost\boost_[version]\libs\. Note the subtle difference. Library directions should always point to the lib folder that contains all the binaries. The Include directory is usually one folder above that one.
Wait a couple of seconds for the project to Parse. The project, once given the location of the Boost libraries, should have zero errors and warnings.

Suppress Warnings
Highly recommended to add BOOST_CONFIG_SUPPRESS_OUTDATED_MESSAGE to the Preprocessor Definitions (found under Configuration Manager/C\C++/Preprocessor/Preprocessor Definitions) before you attempt any build.

Building QuantLib in VS2017
Now go back to the Solution Explorer in VS2017. Right-click on Solution ‘QuantLib’ and click Build Solution. If you’re lucky then this will work first time (and take about 30 minutes). If you’re unlucky (like me, who had a fresh install of VS2017 for the first time) then you are very likely to run in to some trouble.
First Attempt

The first error I received was: Windows SDK version 8.1 not found. OK, easy fix. I just closed down VS and opened up the Installer app, find the installed Visual Studio 2017 application, and click the Modify button. Then navigate to the Individual Components and installed Windows 8.1 SDK. Here is the same question asked in StackOverflow.com.
Second Attempt

The next error I received was: Cannot open include file: 'stddef.h', and Cannot open include file 'string.h'. Again, an easy fix. Had to close down VS and open up the Installer app again and install Windows Universal CRT SDK. Apparently the headers, sources and standard libraries are now distributed as part of a separate SDK – and I didn’t install them originally with my new version of VS2017. Here is the same question asked at Microsoft.

Third Attempt
I’ve covered this one already but it was at this stage that I started getting a whole bunch of “Cannot open include file: 'boost/config.hpp'. File not found.. This was because I had added the Boost libraries to the Solution Manager and not the Project Manager user properties. To help, I also added the Boost libraries to the Configuration Properties\C/C++\General\Additional Include Directories just to be safe. This step doesn’t hurt.
Fourth Attempt
Now I started getting the dreaded Linker error: LNK1104: Cannot open file 'libboost_system-vc110-mt-gd-1_51.lib'. I hate Linker errors. To fix this I had to add a specific sub-folder in the Boost directory to the Linker. The specific folder being C:\...\Boost\boost_[version]\stage\libs\ to the Configuration Properties/Linker/General/Additional Library Directories. Here is the same question being asked at StackOverflow.com.
Fifth Attempt
By now the build was getting quite a fair way through the program. Then I started get a bunch of C4996 deprecated errors (particularly on 'QuantLib::BSMOperator::BSMOperator') . This would halt the build and cause it to fail. I read that apparently new projects enable “SDK check” by default now, which treats these warnings as errors. To disable it, go to project properties -> Configuration Properties -> C/C++ -> General -> SDL checks -> No. Here is the same question being asked at StackOverflow.com.
Sixth Attempt
Success! The whole thing compiled in Win32 Release mode!
Now create a new project and a new Windows Console application. When it loads, tell your project where your Win32/Release-Mode build of QuantLib is by Right-Clicking your Project, going Properties and then Configuration Properties > VC++ Directories. Add in your Quantlib directories to the same location that you built QuantLib to:

Now create an a new C++ file and type in the following (you should have no problem including the ql library).
#include <ql/quantlib.hpp
#include <iostream

int main()
{
QuantLib::Calendar myCal=QuantLib::UnitedKingdom();
QuantLib::Date newYearsEve(31,QuantLib::Dec,2008);

std::cout << "Name: " << myCal.name()<< std::endl;
std::cout << "New Year is Holiday: " << myCal.isHoliday(newYearsEve)<< std::endl;
std::cout << "New Year is Business Day: " << myCal.isBusinessDay(newYearsEve)<< std::endl;

std::cout << "--------------- Date Counter --------------------" << std::endl;

QuantLib::Date date1(28,QuantLib::Dec,2008);
QuantLib::Date date2(04,QuantLib::Jan,2009);

std::cout << "First Date: " << date1 << std::endl;
std::cout << "Second Date: " << date2 << std::endl;
std::cout << "Business Days Betweeen: "<< myCal.businessDaysBetween(date1,date2) << std::endl;
std::cout << "End of Month 1. Date: " << myCal.endOfMonth(date1) << std::endl;
std::cout << "End of Month 2. Date: " << myCal.endOfMonth(date2)  tmp;

return 0;
}
Troubleshooting
C/C++ Compiler and build tools errors and warnings
If you encounter the error: “‘cl.exe’ is not recognized as an internal or external command error” when trying to build QuantLib then this means that you haven’t installed the correct C++ developer modules with your visual studio.
To remedy this issue, please follow the Microsoft install guide here for C++ developer support. I ended up re-installing all the selected optional tools in the following image, restarted, and I no longer got the missing cl.exe file error.

References
- https://www.quantlib.org/install/vc10.shtml
- https://github.com/lballabio/QuantLib/releases/tag/v1.31.1
- https://quantnet.com/threads/tutorial-quantlib-boost-installation-in-visual-studio-2012.11891/
- https://github.com/mrslezak/QuantLib_1.23-Boost_1_76_0-Win10
- https://leanpub.com/implementingquantlib
- https://leanpub.com/quantlibpythoncookbook
- https://learn.microsoft.com/en-us/cpp/build/vscpp-step-0-installation?view=msvc-170

Did you build the entire Boost library from scratch, rather than downloading the prebuilt version? That’s all I can figure out by running the b2.exe. I also found the Boost website incredibly unhelpful for passing the compiler to use and any other options in the user-config.jam files. It seems they just get ignored…
I’m just super confused here, your post is very helpful, but I’m not a C++ expert. I typically code in Python / Cython / VBA / MATLAB / etc. But anyhow, once my computer settles (no idea what it’s doing at the moment, just apparently hanging), I’ll continue through your tutorial. Appreciate you posting it, even though I have 2019 VS now. I have one more step than you, that is to implement it in Enthought/PyQL. God who ever thought getting these programs all working together would be such a pain….
Hi Matt. Yes, I did build the Boost library from scratch on to my C:/…/Boost/boost_1_66_0. My QuantLib solution’s Configuration Properties / VC++ Directories also has the same path under Include Directories and Library Directories.
Seems building Boost is a 2-step process, with quite outdated documentation, and adding QuantLib on top is even less informative. I did manage to create directions that actually work here (MSVC 2017, SDK 8.1 and 10.x). With libs already compiled for download. Just visit GitHub under mrslezak and go to this project here: QuantLib_1.22-Boost_1_76_0-Win10
Nice work on your Git repo. I hope you don’t mind, but I have also included your write-up in my blog references. I particularly like how you managed to get it working with SDK 8.1 to match your Python version.